The ZPacks Altaplex Review
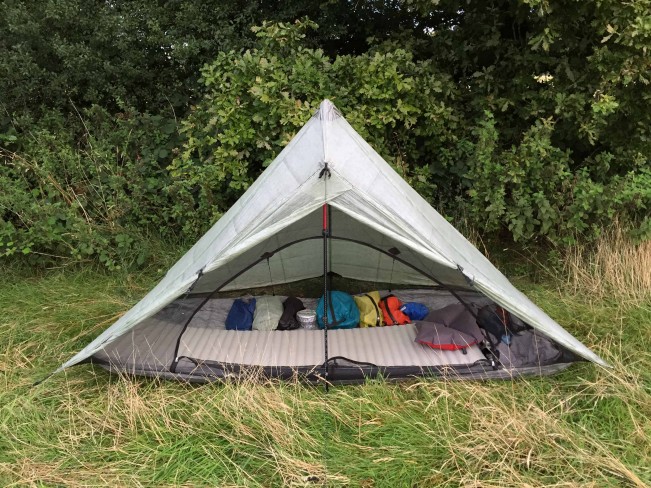
The Altaplex on a recent trip up on the North Downs.
In February 2014 I posted a review of the ZPacks Hexamid Solo (here). It caused quite a stir in outdoor circles when it was released (the tent, not my review), and continues to do so. Despite being on the market for a few years, in terms of what it offers, it’s still a market leader. However, as with every item of outdoor gear, it has positives and negatives. The main downside of the Hexamid Solo, at least in some people’s opinion, was its dubious performance in wet and windy weather. I never had too much of a problem with it but would suggest that it is better suited to milder climates, for example, it would excel on long hikes such as the Pacific Crest Trail, where all an adventurer really needs is protection against bugs and occasionally some wetter weather.
Wisely, despite some claims of its shortfalls in these conditions, ZPacks have pretty much left it alone. I received many emails after my review, all centred on potential buyers and their concerns about its use in wet weather. I’m sticking to my advice but if you’re still not convinced about the Hexamid Solo, then I have the answer for you, and it’s called the Altaplex.
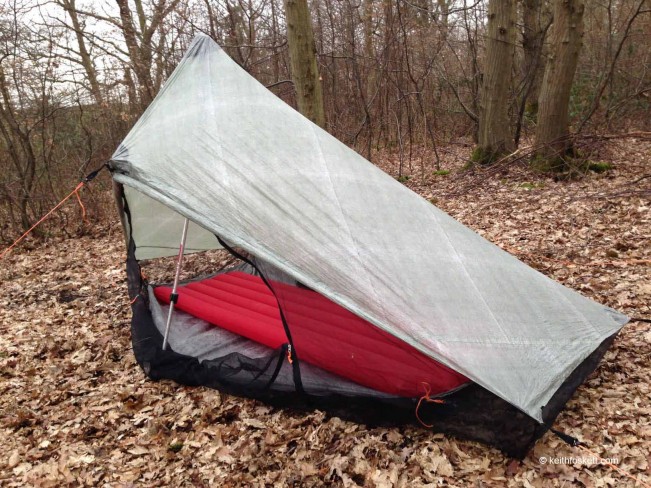
The Hexamid Solo – You can see the basic design similarities with the Altaplex.
Appearance wise, both shelters look remarkably similar and this is because they are. The Altaplex does seem to have taken some basic design features of the Hexamid but tweaked them to provide firstly, far superior poor weather performance, secondly a lot more room, and lastly a cuben fibre bathtub floor instead of insect mesh.
I still use my Hexamid Solo, and will continue to do so until it’s past its lifespan. As some sort of indication of ZPack’s gear durability, the Hexamid Solo kept me company on part of the Appalachian Trail, some 1,000 miles, a 1,000 mile jaunt on El Camino de Santiago, and several shorter hikes such as the South Downs, and North Downs Way. I reckon it has around 2,500 miles on it and shows no signs of breaking down anywhere, including most people’s concerned area, the mesh. So, we know ZPack’s shelters, and the materials they favour are durable.
Construction.
The walls are constructed from .51 oz / sq.yd Cuben Fibre, whilst the floor, wisely, uses 1.0 oz / sq.yd. Obviously the thinking here is that the floor is prone to more wear, being in contact with the ground with all of a hiker’s weight on it overnight. The bug netting, stretching from the bathtub to the apex at the front only, is 0.7 oz / sq.yd. It is also utilised between the bathtub and shelter walls on the rest of the sides, which aids airflow (see photos for a better idea of this). A rainbow zipper means the entire front of the Altaplex can be opened up, allowing very easy access.
Space and Dimensions.
One of the big advantages is the internal space. Not only have ZPacks increased internal floor space over the Hexamid Solo, they have also increased the height. To boot, in wet weather, two storm doors can be pulled across allowing a generous 21” / 54cm vestibule depth to stow gear in and / or cook. Here’s some figures for comparison:
Outer Tarp
Tarp height: 58” / 147cm.
Width at centre: 48” / 122cm
Width including vestibule: 69” / 175cm
Width at ends: 44” / 112cm
Interior
Peak height: 58” / 147cm
Floor width: 36” / 91cm
Floor length: 7.5 feet / 2.3 metres
Zipper entry height: 36” / 91cm
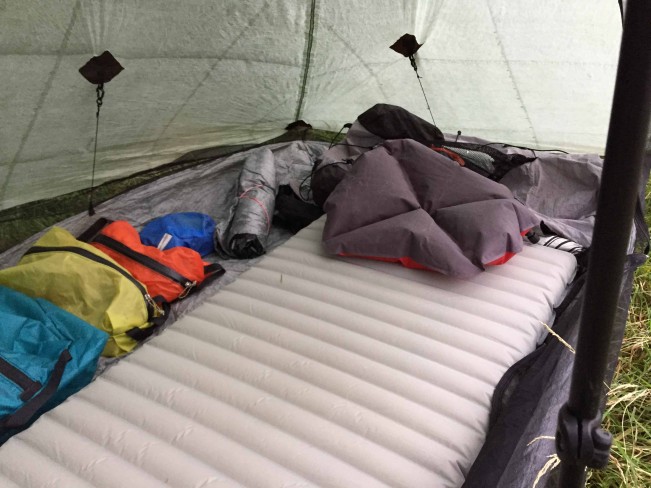
Here’s how I organise the internal space. Mat against the front with backpack sideways at the end of the mat. All my gear fits down one side.
To put this in perspective, the Altaplex offers 11” / 28cm more height, 4” / 10cm more internal centre width, and 6” / 15cm more internal length over the Hexamid. I’m 5’11” and can comfortably sit inside with acres of room overhead. My Thermarest mat, once inside, still affords enough room at one end to fit my backpack in widthways. The entire contents of my thru-hike pack will all comfortably fit down one side. It is a veritable palace inside and whereas the Hexamid Solo was somewhat tight on both width and length, the Altaplex delivers so well here that I can’t see any hiker having issues.

Instead of going for an increase in floor dimensions, ZPacks have put a little more thought into the Altaplex and come up with the simple, and clever solution of increasing the height. Picture a wigwam (bear with me here), you could have a huge internal floor space of twenty feet in diameter, and perhaps the same twenty feet in height. Result? Stacks of head room. However, decrease the height to four feet and pretty much all that floor space would be rendered useless. It’s the same with the Altaplex, it is tall, surprisingly so when you first pitch it but the bonus is that the walls benefit from a steeper angle. So, not only is the floor space pretty generous anyway, but the walls are further away from your head and body. I especially notice the increased head room over other shelters.
Although not sold as a four season tent, I reckon it would do pretty well because of the steeper angle of the walls, which should result in the ability to shed snow effectively.

Four lines attached to the walls of the Altaplex increase stability and aid internal space by pulling the walls out.
Ventilation
Excellent, and why wouldn’t it be? 90% of the time I sleep with the storm doors rolled up, meaning the entire front of the tent lets in air which can move freely around. The mesh inserts where the walls meet the bathtub also aid ventilation and the result, when the doors are rolled back, is no condensation most of the time. With the doors down, and it raining outside, I expect some moisture to collect on the interior walls, and it does. But, not to a significant extent.
By the way, as with the Hexamid Solo, and many of ZPacks other shelters, this front insect mesh results in a wonderful place to spend the night. You benefit from decent airflow so the tent isn’t stuffy, and more importantly, you can see out. We all know how rewarding sleeping outside with no shelter at all can be, especially in terms of being able to see around, and the Altaplex will get you as close to this feeling as possible, whilst being protected from the elements.
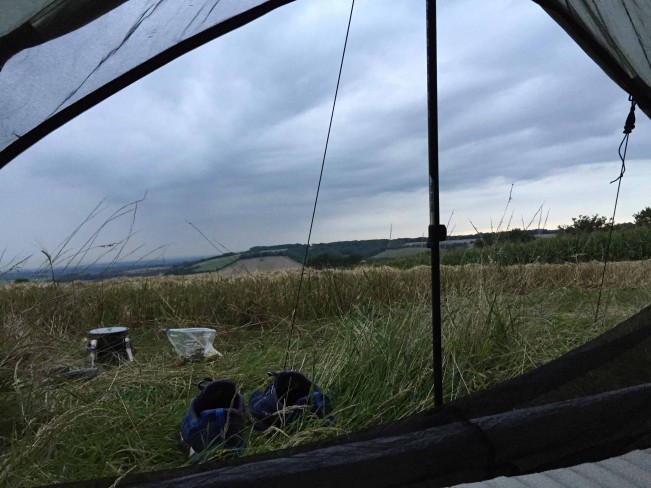
A great sense of space, and being in touch with the outdoors is common with ZPacks shelters.

The rainbow zipper allows easy access & with the storm doors rolled back (as shown here) – the ventilation is excellent.

Further mesh inserts run between the bath tub floor and outer, as shown here.
Storm Doors
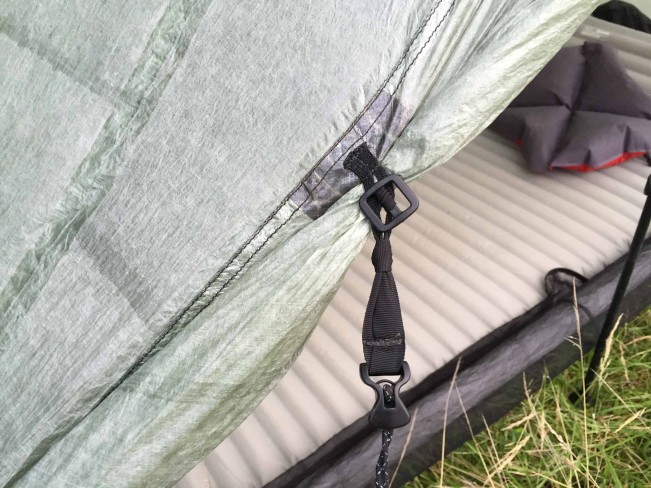
Whereas the Hexamid Solo has what is referred to as a ‘beak’ for wet weather protection, considered by many to be a weak point when the rains hits, the Altaplex’s storm doors should banish any worries. Unrolled on both the front sides, they join not by a zip or similar fastening, but to save weight ZPacks have not used anything other than a tent stake in the ground, already utilised by the Altaplex’s front stake point, and a small guy-line extension where a karabiner clips on to a plastic loop on the bottom corner of each door. A Lineloc adjuster pulls both doors snug with a slight overlap. Rain will drip through but as the doors are angled away from the shelter, it just falls on the ground well away from the inner.
I’ve used the Altaplex in some pretty disgusting weather, recently on the Cape Wrath Trail, and West Highland Way. A total of 31 days of which I was rained on for 28, much of it overnight. I never had any rain ingress with the doors shut, stayed completely dry and on several occasions, when I thought it would be dry overnight (yeah, right) and didn’t even bother securing the doors but left the front open, I still remained dry.
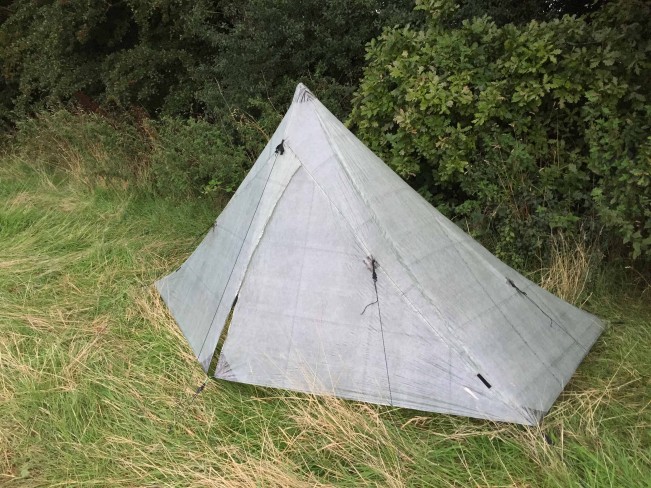
Storm doors shut – They have proved very reliable in keeping out the elements. The small gap near the bottom is probably a result of the front two corners being set up too far apart, but has little effect in letting the rain in.
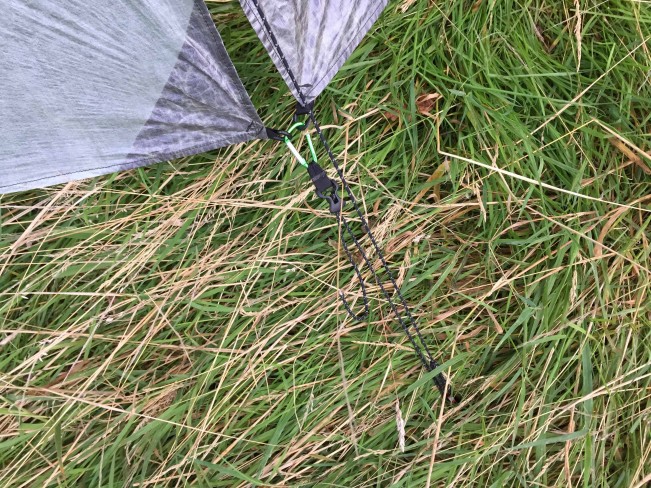
The main, front central guy line is pegged out, & a shorter return secures both doors via a LineLoc adjuster. It works but I’d like to see an extra two guy lines on the front of the Altaplex to take the pressure off this set up.
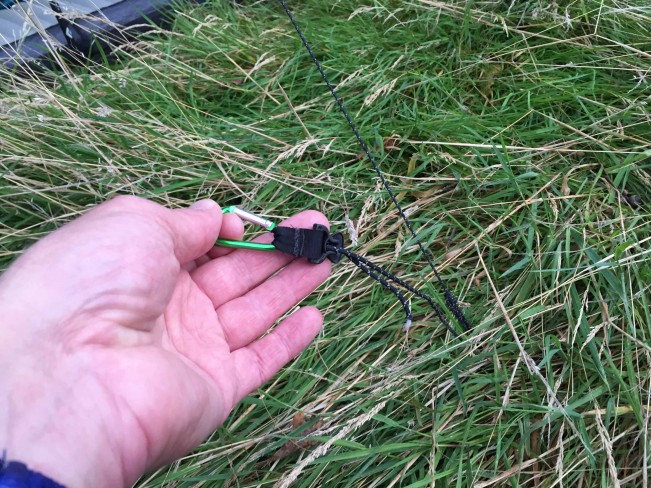
Front main guy line is secured, and this extension used with a Lineloc and karabiner secure the storm doors if needed.
Bath Tub Floor
The other improvement over the Hexamid is the bathtub floor. I have no signs of wear here so far, although I always use a section of Tyvek under the shelter as added protection, although ZPacks advise this is not necessary because of Cuben’s strength, I’d advise on using one and they do indeed offer either Tyvek or a dedicated Cuben ground sheet. Bathtub floors do offer piece of mind and this one is a whopping 8” / 20cm tall, kept taught off the ground by elastic cord attachments that secure to the tent wall. It all works well although I do find that the centre rear area tends to not lift off the ground, but rather stays down at ground level. This may be due to my pitching but either way, it doesn’t bother me.
To bolster its wet weather performance, Zpacks score well because they tape all the seams in their shelters. Not just offered as an extra, like most manufacturers, it is included in the price so saves you crawling around inside on a hot day with an annoying tube of Seamseal sticking to your fingers, whilst getting high on solvent during the process.
Set Up
Having used the Altaplex a lot this year, I can pitch it in around two minutes. Six stake out points are all that’s required, although the Altaplex has ten, and Zpacks recommend you utilise all of them. Four of these points secure the shelter walls, and pull them out slightly. You’ll need your trekking pole, or one of ZPacks dedicated tent poles if you don’t have any trekking poles. Because of the Altaplex’s height, some poles may be too short, so you will also need a carbon fibre pole extender to make up the difference.
My Black Diamond Trail Ergo poles have enough extension to meet this height, but when I initially purchased the Altaplex, I was using Komperdell Ultralight Vario 4’s. These were too short so I ordered a pole extender to deal with the shortfall. This in one of two areas where I have minor grumbles. The extender slips over the tip end of a trekking pole, the diameter of the extender being slightly larger to accommodate the tip. However, the extender only makes it about 2” / 5cm up the tip and I don’t think this is enough. In strong winds where the shelter is flexing and moving, the meeting point between pole and extender bends somewhat like a hinge. Although both have never separated, it’s slightly worrying to look at. Second, my first extender split down the length, the result of me obviously pushing it too hard onto the pole. I’m slightly less heavy handed with the replacement (which ZPacks replaced free of charge), and it’ been fine, although I have wrapped a section of Duct Tape tightly around the end to improve the strength.

One trekking pole acts as the main shelter support. ZPacks also sell a dedicated pole for those who don’t own trekking poles.
Second grumble focuses on the front stake out point, which I have explained also acts as the securing point for the storm doors. Using all of the Altaplex’s ten guy-lines, I find it disconcerting that there is just one at the front (two if you include the front corners), whilst the remaining seven run around the back and sides. In strong winds coming in from the front, it’s just too much to ask of one anchor point, couple it with the storm doors being anchored, especially when pulled tight with the LineLoc adjuster, and one two occasions I’ve experienced the stake being whipped out of the ground, flying in an airborne arc to land somewhere in the woods behind me, and the whole shelter blows over. And yes I know we are supposed to pitch a shelter’s side into the wind, but wind directions changes sometimes.
Fortunately, it’s easy to resolve. Firstly, don’t be too heavy handed when tightening the storm doors down. Secondly, and something I’d like to see ZPacks address, is to add two extra guy-lines to the front. I did this easily by using two extra lengths of line attached to two plastic loops which are already in place for securing the storm doors once folded back, although they still work with the doors down. This results in three stake out points to the front which improves the stability, and takes some pressure off the solitary centre guy line. After this initial set up, everything has been fine.
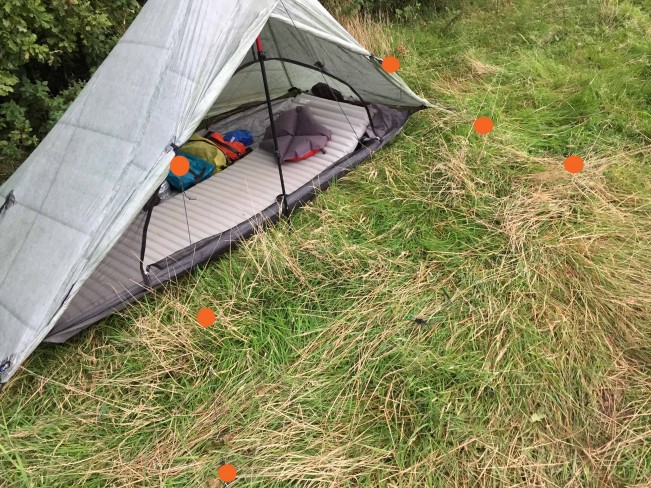
Here you can see the two extra guy lines I have added which improves the stability at the front of the Altaplex.
I fixed the extra two front guy lines via existing loops already in place to secure the storm doors.
I would have done a set-up video but Joe has already beaten me to it, and probably done a better job here:
Yellow Spectra cord is supplied as standard but I changed this to 2.3mm reflective glowire for one simple reason. The yellow Spectra does not come with any adjusters, and no matter how proficient you become at pitching, I find adjustments are always needed. I’ve used LineLoc 3 adjusters for years now, they’re beautifully simple and fool proof, but they won’t work with the supplied Spectra cord, you would need to order the reflective glowire and Linelocs themselves. As the name suggests, they also reflect back from your head torch, something you might not consider that important until you try and find your way back to the tent in the early hours after a pee call in the middle of the Appalachian woods.

LineLoc 3 adjusters. Still love ’em.
Weights
As for the weight, well it’s bound to be good because that’s where ZPacks excel.
The Altaplex tarp alone (you can buy this without the inner) is 8.1 oz / 230 grs.
The included guy lines are 0.9 oz . 25 grs.
The sewn in cuben fibre bathtub floor is 7.6 oz / 216 grs.
The stuff sack (included) is 0.3 oz / 8 grs.
Total weight for the shelter including the taped seams is 16.9 oz / 479 grs.
For a shelter of this size and strength to be not just under 17 oz / 500grs, but a decent way under is remarkable and I’ll say here what I said after my review of ZPack’s Arc Blast Pack – Does any shelter, or pack, need to be over what I consider the break point for both, the 600 gr mark? To further the advantages of ZPack’s gear, three of their sleeping bags, including the model good down to -7C / 20F, are also well under 500 grs. Their 5C / 40F bag weight is just 323 grs (medium length / regular width), giving you a weight for your three main hiking items, pack / shelter / bag of a ridiculous 1,397 grs / 49 oz.

Anything else?
The whole unit packed away in the supplied stuff sack measures 7” in diameter x 13” in length (18cm x 33cm). This is pretty much the length and width of a lot of backpacks, especially their Arc Blast, so it sits nicely right down at the bottom utilising the space well.
Pricing
Price for the shelter, bag and included lines is $565 / £377 based on an average $ to £ exchange rate of $1.5 to the £. Extender pole and different lines extra. Shipping is free on orders over $100 in the US, but expect to pay a further £30 to get it over here in the UK, and don’t forget Her Majesty’s Conmen, sorry, Customs and Excise, may well pull your package over and hold it unfairly to ransom until you part with more cash.
Cheap? No it’s not. Around $200 / £133 more than a lot of other offerings from the likes of Tarptent, Six moon Designs and Hilliberg to name but three. But, if weight is your concern, none of the others will come close.
To summarise
Yes there are a few minor grumbles which are easily overcome but Zpacks appear to have knocked out another super light, compact, bombproof and packable shelter made from Cuben Fibre, now considered by many to have overcome some initial teething problems from a few years back. It’s very roomy, not just in floor space but height as well. They have addressed the inclement weather performance worries some people had with the Hexamid Solo by the inclusion of the well-designed storm doors. Durability should prove excellent if the Hexamid is anything to go by, in fact my Altaplex has around 1200 miles already with no signs of wear at all.
Specs, pricing, ordering and more details can be found on ZPacks website.
In the current disclaimer fashion I’m obliged to tell you that although I didn’t receive this Altaplex for nothing, it was discounted in return for this review, whether positive or negative.
Click on the logo to take you directly to ZPacks website and the Altaplex page:
Post Review Additions:
Due to my usual lack of research and planning I should point out a couple of small points that came to light after this review was posted.
Firstly, the Hexamid Solo now comes supplied with storm doors by default, not the beak setup. The karabiner used to secure the doors on the Altaplex has now been replaced with two plastic hooks. Also on the Altaplex, two square, plastic buttons were used to secure the storm doors when folded up, these have now been replaced with toggles.
